
If your depth feels off, your crew loses time fast. Calibration is the quickest way to get your locating system back to numbers you can defend on a jobsite.
This guide is built for HDD crews and utility contractors who need a clean process. You will learn how to prep the site, install the transmitter in the housing the right way, run a repeatable 1-point routine, and verify results with a measured check.
When the setup still won’t stabilize, you’ll also see when replacing gear is the fastest way to protect schedule and margin.
What Calibration Does and When You Actually Need It
Calibration is not a ritual. It is a controlled reset that helps your receiver interpret the transmitter signal the way it should be interpreted in your current setup.
With DigiTrak F5, you should recalibrate when one of three things changes: the transmitter, the receiver, or the physical configuration around the transmitter.
A physical configuration change can be as simple as swapping a housing, changing how the sonde is seated, or moving from an open yard to a tight, metal-heavy corridor.
Do it when you see any of these field symptoms:
- Your depth estimate feels inconsistent from pass to pass.
- You get usable roll and pitch, but depth confidence drops.
- Your crew must hunt for peak more than usual.
- You changed frequency options, or you are forced to run a different band because of interference.
Do not recalibrate just to feel busy. If your readings are stable and your verification check passes, let the system work.
Calibration also ties to frequency bands. If you assign a new optimized band, treat it like a configuration change and calibrate for that band before you drill.
A practical decision rule helps crews avoid overdoing it. If you are switching between bands that were already paired and calibrated, calibration is not automatically required.
If you changed a component, a housing, or a band you plan to run, calibrate before drilling.
Pre-Calibration Checklist for Clean Results
Most calibration failures come from the site, not the menu. Before you touch settings, make sure the jobsite is not sabotaging you.
Start with the environment:
- Move away from parked equipment, steel plates, fences, rebar mats, and large generators.
- Avoid calibrating next to a trailer, drill, or a truck bed.
- If you must calibrate in a noisy corridor, pick the cleanest pocket you can find and keep people from walking through your setup.
Do a quick interference reality check before you commit. Power on the receiver and watch whether the signal stays stable while you stand still.
If your readings jump when nothing moves, you are likely fighting noise, not technique. Move first, then calibrate.
Then check the system basics:
- Confirm batteries are solid on the receiver and remote display.
- Confirm the correct transmitter option is selected and active.
- Confirm your crew can keep the receiver position steady during the routine.
Set one measurable condition the crew can agree on. Use a tape or marked rope so your start positions are repeatable during calibration and verification.
If the site is noisy, moving 20–30 feet to cleaner ground beats repeating calibration in the same spot.
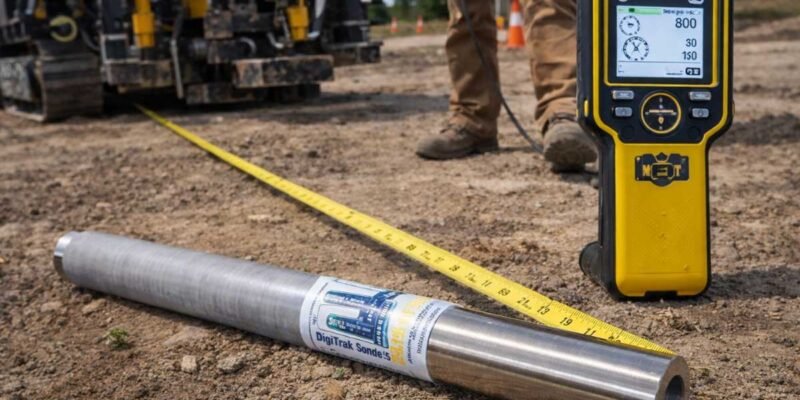
DigiTrak Sonde F5 Housing Setup That Keeps the Signal Honest
A transmitter cannot calibrate into a stable system if it is loose, mis-seated, or installed in a way that changes orientation during the drill.
Housing is not just protection. Housing is the mechanical truth your locating data depends on.
If you calibrate with a sonde sitting on the ground, then install it into a tight housing inside the drill head, you changed the world the receiver is trying to model.
Your results can look fine for five minutes and then drift once drilling begins.
Below is a practical setup approach crews rely on because it reduces surprises and repeat work.
What a Sonde Housing Does in Real Field Terms
A housing does more than protect electronics. It locks the transmitter into a repeatable physical state so the receiver can interpret the signal the same way every time.
With DigiTrak Sonde F5, that repeatability is what keeps peak, depth confidence, and orientation from drifting when vibration starts.
In field terms, the housing has three jobs. First, it prevents micro-movement that shifts peak location from pass to pass.
Second, it stabilizes orientation. Roll and pitch are only meaningful if the transmitter stays aligned the same way relative to the tool head.
Third, it reduces intermittent failures. A compromised seal or worn contact surface can create works-sometimes behavior that mimics interference.
Treat housing as part of the locating system. If you change the housing, the drill head, or how the sonde is seated, you changed the physical setup the receiver is calibrating against.
Installation Steps That Prevent Drift and Rework
Use a simple standard: if you can feel movement by hand, it is too loose for confident tracking.
Start by cleaning the seating surfaces inside the housing. Dirt and grit can create false tightness and allow the transmitter to settle later under vibration.
Next, inspect seals and contact surfaces. If an O-ring is nicked or flattened, replace it before the run.
Water and drilling fluid intrusion does not always kill a transmitter instantly. It can create intermittent behavior that wastes time because it looks like noise.
Seat the transmitter fully and lock it down to the correct tightness for your hardware. Under-tightening is a common cause of drift.
After tightening, do a controlled motion check. Hold the assembly and apply gentle torque and push-pull force to detect hidden looseness.
Finally, confirm the orientation your crew uses is still valid once installed. A consistent reference mark now prevents mystery roll and pitch complaints later.
If the transmitter can move, your readings can “move” too. Fix the fit before you touch settings.
Step-by-Step: 1-Point Calibration You Can Repeat
This section is built for repeatability, not theory. The goal is a routine the crew can run the same way on every job.
Use a measured setup. Place the transmitter in its housing and use a fixed distance between the transmitter and the receiver before you start prompts.
On many crews, a 10 ft setup works because it is fast to measure and easy to repeat.
Pick a straight, flat spot. Place the transmitter housing on stable ground in the same orientation you will run in the drill head.
Measure 10 ft from the transmitter to your receiver start position using a tape. Mark both points.
Now run the routine:
- Confirm the receiver is tracking the active transmitter and showing stable data before you enter calibration.
- Select the band you will actually drill with before you start the routine.
- Open the main menu on the receiver, then go to Calibration, then choose 1-point calibration.
- Follow on-screen prompts exactly and keep the receiver still at each prompt.
- If the routine requests a re-position, move smoothly to the next marked point and stop fully before confirming.
- Complete the routine and save the result without exiting early.
- Run an above-ground range check on the same band you calibrated before you drill.
- If you plan to switch bands mid-job, calibrate and verify both bands while you are still in a clean area.
With DigiTrak F5, success looks like repeatability. You can run the routine twice and get the same outcome.
Failure looks like a completed routine followed by a verification reading that is obviously wrong or shifts when nothing moves.
Stop rule: if verification shifts while nothing moves, change location and re-check housing fit before recalibrating again.
AGR, Depth Confidence, and a Verification Routine You Can Defend
Most crews do not need a lecture about depth algorithms. They need a fast way to confirm the system behaves in the real world.
Think of verification as a short quality-control step. You are not proving perfection.
You are proving the setup is stable enough to drill without guessing.
What AGR Tells You and What It Does Not
AGR is useful because it forces the system to behave consistently above ground before you trust it below ground.
It does not guarantee a perfect bore path. It does not remove noise from a corridor.
It does help you spot interference, movement, and mismatched settings while you still have time to fix them.
Treat AGR as a gate before drilling, especially when you assigned a new band.
If AGR is unstable above ground, the most common causes are interference, inconsistent receiver height, and movement inside the housing.
Calibration is not the cure for all three. Your goal is to identify which one you are fighting.
Fast Verification Steps Crews Can Run in Minutes
Run verification like a mini test, not a casual sweep. Use a tape and a fixed height so you can repeat the result.
Start with the transmitter in its housing on stable ground. Measure a known distance such as 10 ft between the transmitter position and the receiver position.
Mark the spots so the second pass starts in the same place.
Keep the receiver at a consistent height above ground. Height changes can look like depth changes, especially on uneven ground or when an operator changes stance.
Now perform two passes. On pass one, sweep slowly to find peak response and record the distance reading you see.
On pass two, step back, reset your stance, and repeat from the same start mark.
With DigiTrak Sonde F5, your normal result is repeatability. Peak occurs in the same place and the distance reading stays close to the measured tape distance.
If the reading is off, change one variable at a time. First move to a cleaner area away from metal.
Second re-seat and tighten the housing. Third confirm the receiver is on the same band you calibrated.
If two passes don’t match, don’t drill. Fix the environment or the fit first.
Troubleshooting: Failures, Weird Depth, and Bad Signal Without Guessing
Good troubleshooting is not a long checklist. It is a short set of decisions that isolate the cause.
Use the symptom-first approach below. Fix the easy causes before you assume hardware is failing.
Calibration Fails Mid-Process or Will Not Complete
Most failures come from three causes: interference, unstable handling, or wrong configuration.
Start by moving your setup away from obvious metal. Then confirm battery strength and confirm the correct transmitter option is selected.
Re-run the routine with slower movements and a stable stance. If the routine fails again, do not repeat it three more times in the same place.
One practical field test is to repeat the attempt in a second location.
If the routine fails in one spot but passes in a cleaner spot, you were fighting interference.
If it fails in multiple clean spots with stable handling and correct settings, suspect a weak transmitter battery, a damaged housing interface, or a failing component.
Receiver Will Not Show Transmitter Data
When the receiver cannot see the transmitter, the system cannot calibrate.
Confirm the transmitter is actually on. Then confirm the receiver is tracking the correct option for that transmitter.
If you recently changed bands or swapped components, double-check that you selected the correct band before entering calibration.
Test in a different location with fewer metal objects.
If your crew has a known-good transmitter, do a quick swap test to separate a transmitter problem from a receiver problem.
If detection fails in a clean area with a known-good setup, stop troubleshooting menus and treat it as a hardware issue.
Depth Feels Wrong After a Successful Routine
A completed routine can still produce bad field behavior if the physical setup is wrong.
Check housing looseness and seating first, because movement creates consistent-looking errors that waste hours.
With DigiTrak F5, separate bad depth from bad confidence. If verification is repeatable and matches your measured distance above ground, the issue may be jobsite interference changing once equipment moves in.
If verification is not repeatable, fix the physical setup before you touch calibration again.
Re-seat and tighten the housing. Move away from noise sources. Confirm the same band selection you calibrated.
If you still cannot get repeatability in two clean locations, treat it as a component issue.
A Field Workflow That Keeps the Crew Fast and Consistent
A good workflow turns calibration into a habit and reduces arguments on the job.
It also gives you a stop rule so you don’t burn labor chasing uncertainty.
Use this sequence at the start of a job, after equipment changes, and after a hard interference day:
- Install the transmitter into the housing exactly as it will run.
- Run the pre-calibration checklist and pick the cleanest spot you can find.
- Complete the 1-point routine with measured start positions.
- Run the verification steps twice and look for repeatability.
- Log what you used so the next setup is faster.
This workflow solves a common problem. Different operators develop different habits, then no one trusts the numbers when the lead changes.
A shared routine eliminates that.
If you do this routine in two locations and cannot get stable verification, stop troubleshooting in circles.
When the process is solid but results won’t stabilize, it’s time to swap the weak link.
Buy DigiTrak F5 Locating Equipment from UCG HDD and Avoid Downtime
When you are troubleshooting in the field, there is a point where repair-by-guessing costs more than a tested replacement.
The goal is to finish bores on schedule.
If you need a tested replacement fast, you can check what’s currently for sale, compare price options, and see available DigiTrak F5 inventory here: https://ucghdd.com/collections/digitrak-f5.
On that collection page you’ll see receivers, remote displays, transmitters, and complete system options.
Use it to match the part you are troubleshooting to a ready-to-ship replacement and get back to work.
Step 1: Choose the Right Setup for Your Crew
Start with how you operate.
If you want a complete kit, choose a full system that covers what the drill and the walkover locator both need.
If you already have a working receiver, you may only need a compatible transmitter option for the conditions you face.
Fast path: identify the component that fails verification, then replace that component first.
Step 2: Plan Shipping Around Your Job Schedule
Downtime is expensive, so shipping speed matters as much as price.
UCG HDD offers next-day delivery options for domestic orders and ships worldwide.
If a job is starting tomorrow, arrange the fastest delivery option at checkout or by phone so you are not waiting on standard transit.
Step 3: Understand Warranty and What It Changes
Warranty reduces the risk of buying refurbished equipment.
UCG HDD provides a 100-day warranty on refurbished sondes, and coverage starts on the delivery date.
If you are buying transmitters, review the warranty policy for your specific series so you know what is covered and what is excluded.
When calibration and verification won’t stabilize after you fix housing fit and move to a cleaner area, your problem may be the transmitter or receiver.
FAQ: The Questions Crews Ask When Calibration Is on the Line
Do I Need to Recalibrate Every Day
Not if your verification routine is stable and your setup has not changed.
Recalibrate after equipment swaps, housing changes, or clear instability.
Can I Calibrate Without the Housing Installed
You can run a routine, but you risk calibrating a configuration you will not actually drill with.
Calibrate as close as possible to your working setup so your verification check means something.
What Should I Do If Depth Looks Wrong but Roll and Pitch Look Fine
Start with mechanical checks.
Confirm the transmitter cannot move inside the housing, then move away from metal and re-run verification.
Should I Recalibrate After a Long Pause in Drilling
After a long pause, re-check your setup with a quick verification routine before you resume.
Conditions and interference can change while the job is idle.
Do I Need to Calibrate Each Optimized Band
If you assign or switch to a new optimized band, calibrate and verify that band before drilling.
If you expect to switch bands mid-job, calibrate and verify both while you are in a clean area.


Comments